
3D Modeling for 3D Printing
Whether you’re looking at prototyping or designing something creative, 3D printing can easily help bring your idea to life. To exploit the potential of rapid prototyping to its fullest, you’ll need to know how to design 3D files.
These files can be designed using a Computer-Aided Design (CAD) software application. These applications are already being heavily used in product design and modeling. While the basic principles of 3D modeling across all design verticals remain the same, there are a few aspects of designing that need to be considered while modeling for 3D printing.
Modeling for 3D printing is slightly different from 3D modeling for renders. The 3D printing experts at Divide By Zero have developed key design tips to help you achieve perfection and accuracy in 3D printing your prototypes and models.
1. Consider minimum wall thickness
Minimum wall thickness is defined as the minimum required thickness that your model should have at any given point. The minimum printable wall thickness depends on the printing technology and material chosen. Read the design guides for the material of your choice carefully (explained in the next section).
Remember, in some cases maximum wall thickness can also cause problems. You need to understand how to assign the wall thickness for every surface of your 3D model. This step might be a bit different in each 3D modeling software. However, it is crucial for preparing a 3D print.
Visualize, analyze and think about your design. If it has weaker sections, think about adding design elements to support and reinforce them. Also, consider how the size of your object will influence the required wall thickness
2. Consider printing material guidelines
Every printing material is different. Materials can be brittle or strong, flexible or solid, smooth or rough, heavy or light, and so on. An object should ideally be designed for a specific material. For example, if you know that you want to print your 3D model in ceramic, there are specific material-related design recommendations that you need to take into account such as supporting overhanging parts, strengthening elements that are sticking out, rounding off corners, etc.
The choice of your printing material only pre-determines some of the basic design guidelines that you need to stick to. Some materials have good strength and hardness and hence thin walls can be made with that material. However, for some materials such as ABS, the walls should be thick to prevent cracking and breakage post 3D printing. So, the designer should structure the models according to the properties of the material to be printed. It also helps if a technically sound personnel of the team guides the designer during the actual drawing/developing process
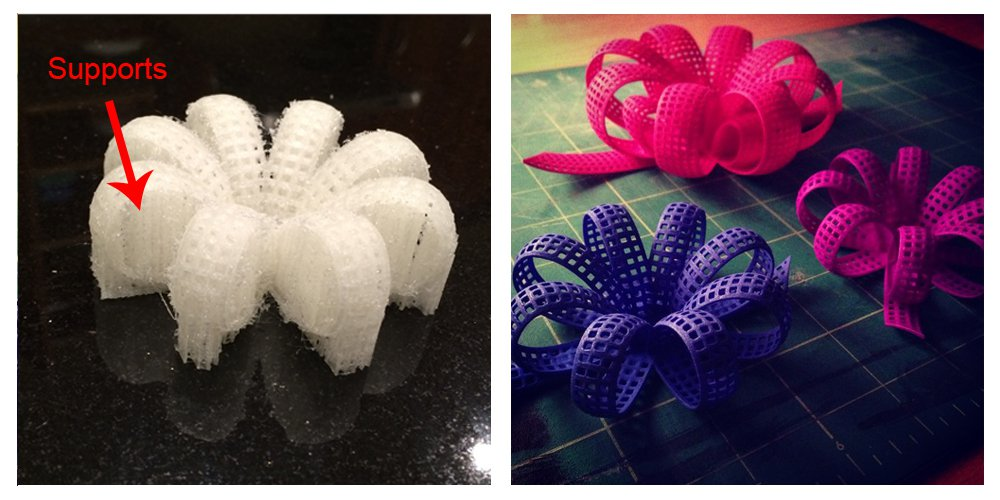
3. Design to avoid or minimize supports
Although support algorithms are improving all the time, support material can leave ugly and unwanted marks on the outer surface of your prints. Support material can also be time consuming to remove. To avoid this, it is best to design your models so that they are 3D printable without support.
Remember the 45-degree rule – if overhangs are greater than 45 degrees, they will need support material. You could use clever modeling tricks to get the model to print. Create your own support/bridging objects (cones and other supports) by designing them into your model. Always aim to integrate the supports into your core design.
4. Model must be watertight
The model must be completely closed or ‘watertight’, as it is more commonly referred to. You can achieve this by adding a 3D mesh suitable for 3D printing. The option to create mesh is easily available in most 3D designing software applications. This process needs to be done before the model is exported as an STL file, as it can be difficult to spot and fix problem areas once the model has been converted. This problem can also occur during file translation from one modeling system to another.
5. Consider STL file resolution
For 3D printing, the most common file format is Standard Triangle Language (STL). In simple words, your design will be translated into triangles in the 3D space. Most 3D modeling software applications have the option to export your designs to an STL file and set the desired resolution. The following is a visual representation of different file resolutions from extremely high (left) to quite low (right):
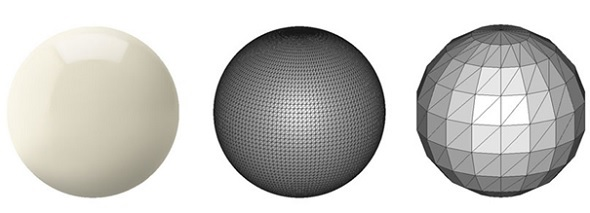
Resolutions that are too low or too high can cause problems while modeling for 3D printing.
Low-resolution STL file : It’s important to be aware that a poor-quality export will never be able to deliver a good print. Low-resolution means that the triangles in your STL file are big and the surface of your print will not be smooth. Just like digital imaging, lower resolutions leads to a “pixelated” print.
Very high-resolution STL file : A file with a high resolution will make your file too big adding challenges during printing. As it contains higher level of details, printing will be time-consuming and some 3D printers may not be able to print at all. We suggest your aim to maintain the file size below 15MB before uploading your model to our website. If you have any doubts or need clarification about the resolution of your model, feel free to contact us.
6. Printing technology limitations
The basic chemical characteristics of printing materials is different. So, the technologies that are used for printing each of these material is also different. The best example of this is interlocking parts. In materials such as ABS, polyamide, alumide, or rubber-like you can print interlocking parts. While in others material such as gold, silver, bronze, or resin, interlocking may not be possible. The reason behind this is not the material itself, but the technology that is used for printing each of these materials.
7. Design a strong base
With typical desktop 3D printers, the model is printed one layer at a time. The plastic 3D printing filament (typically PLA or ABS) is melted and extruded onto a surface, known as the bed. It is critical that this first layer adheres to the bed for the duration of the print. Many a times, prints fail during the first layer, due to lack of adhesion. You need to ensure that you have a strong enough base designed into your model. This will ensure your 3D printing models are strong, robust, and durable. Make sure that the base has the following characteristics:
- Make sure you have enough surface area to create positive adhesion to the printer bed. Adding a raft in your printing software application can also help with this.
- Make sure you have a wide enough base to support model and avoid tipping over during the printing process.
- Make sure that the base of the model is strong enough to resist warping caused by different cooling rates.
8. Thicken Vulnerable Areas
Outstretched appendages from the core of your model might snap off during or after printing, if the point of contact or joint is too thin. The following is an example of the same, with arrows pointing towards vulnerable areas in the 3D modeled cat. Areas where thinner parts such as the tail, ears, and legs connect to the main body need additional thickness.
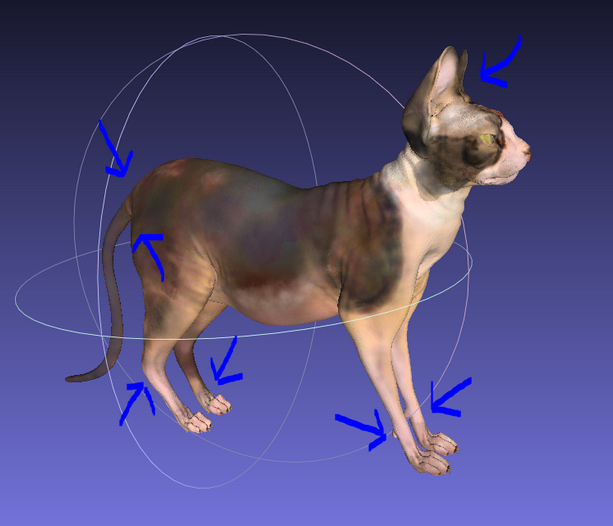
For example, if you are printing a character, pay close attention to wrists, shoulders, neck, and ankles. During the production process, some materials are very delicate when printed and can break during handling or cleaning. In some cases, an air blaster is used to remove any support material.
For example, if you are printing a character, pay close attention to wrists, shoulders, neck, and ankles. During the production process, some materials are very delicate when printed and can break during handling or cleaning. In some cases, an air blaster is used to remove any support material.
You need to consider whether or not your model can survive the 3D printing process. You might need to rework the pose of your character in order to bring appendages back to the core, to create support wires over free wires. This will add to the strength of your model.
At Divide By Zero, we understand the 3D modeling for 3D printing can be tricky. It is is crucial to know that there cannot be a no-one-size-fits-all approach. If you follow the 3D modeling tips mentioned above carefully, your 3D models are sure to turn out as envisioned.
As one of India’s 3D printer manufacturers and 3D printing service providers, we have vast expertise in helping you get closer to your designing and prototyping process. Get in touch with us here: https://digitalmentoracademy.com/divbyz
Take the Next Steps
Enquiry Now
Take the next steps to explore this new and exciting business opportunity selling high-quality, dependable and industrial-grade 3D printing solutions in to your market. Kindly fill the form below to get in touch with Divide By Zero.
Let's Start a Project
Give us a call or drop by anytime, we endeavour to answer all enquiries within 24 hours on business days. We will be happy to answer your questions.
ADDRESS
M–6/7 & O–1, Neighbourhood Complex, Near SBI Branch Sector 4, Off, Palm Beach Rd, Nerul West, Navi Mumbai, Maharashtra 400706
E-MAIL ADDRESS
PHONE NUMBER
+919167943604 / 8828251944